Fancy Pantsy all this for trains WOW ! Nice.
A whole lot fancier then mine…
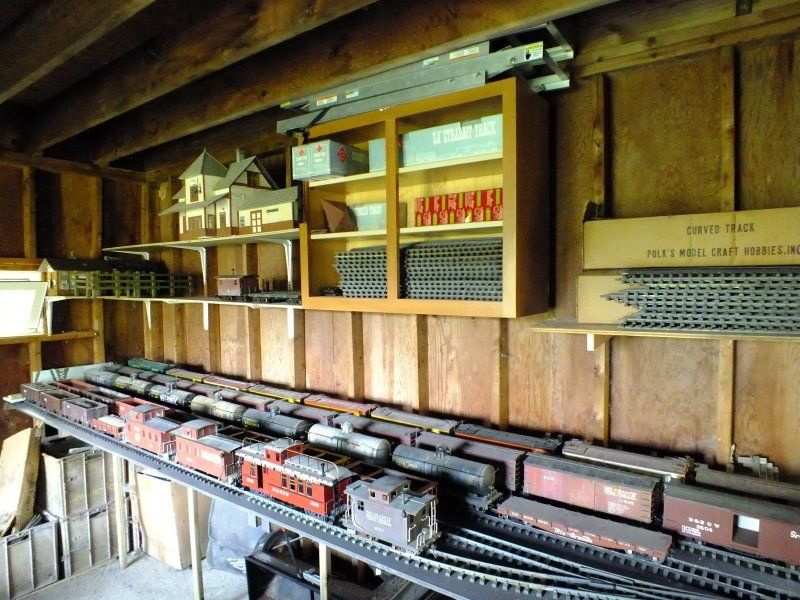
WOW!!! That looks great Rick. My shop office is no where near that big, just 10’ x 8’. Enough room for a desk and shelf’s on the back wall for some of my trains. Just someplace to sit and play while my CNC is running.
If you reduced the spacing between the car storage shelves you might could get another shelf in there and increase your car storage capacity.
That looks like a real nice place you have there.
David,
I tried various schemes to try to reduce the shelf height and be able to add another shelf but just couldn’t make it work out to my satisfaction. But on the bright side 40 plus cars is still a pretty fair storage area

Now for the next installment of this grand adventure in capitol expenditure.
Getting a little farther along and thinking it will be done soon, hopefully. You can see the white trim idea seemed to work out and added some “brightness” to the whole room. Getting a little finish work completed; pictures, display shelving, etc, still have to change out the ceiling lighting and get rid of that yellow cast!

Nearing completion of the shop area, I have changed out the lights to a bright white LED and the overall effect is much better on tired old eyes. I have completed the track work for the inside yard, it is broken into five zones of track power. Track power or not to track power that is the question! A question I am still debating with myself, as I still have several track power locos but really don’t want the exterior track power headaches. I guess we will just start building and see what happens.

The work bench side of the new shop all unpacked and set up ready for projects. Probably won’t be much in the way of projects for a while as I concentrate on building the outdoor sections of the railroad. Although I do have a logging build in mind that requires a Mack truck and lots of scratch building.

Some Birch corner shelving salvaged from the house kitchen remodel make excellent display shelving in an out of the way corner. The wife was quick to inform me that any dusting of said display shelving and contents was my problem

Enough for tonight,
Thanks for taking a look
Rick
Doing good. Still on page two and we have track going down…(http://www.largescalecentral.com/externals/tinymce/plugins/emoticons/img/smiley-wink.gif)
Hi all, it has been a few days so here is a little more of the progress we have made this year.
The old engine shed is installed on the yard bench top and wired for interior and exterior lights. I have decided to use an indoor/outdoor carpet to cover the bench top this time around. This carpet approach is much neater and easier to maintain than the sand/gravel glued in place that I used on the last version

Now the inside of the shop is really complete, one of the most important fixtures has arrived and been installed. Nothing like the comfort of a good rocking chair to help decide what to do next. Speaking of what next you can see the Mack truck project has made it to the bench top for rainy day enjoyment.
Thanks for taking a look
Rick
That really look good Rick. I can’t believe that you would make any kind of mess, it looks to pretty. But I like the way it all looks.
Chuck
Dang, I’d be afraid to work on anything in that shop.  I hope you have a sacrificial counter top.
Nice man cave.
I’d take that rifle over the train door and lean it up against the wall next to your armchair. Just to suggest there might be consequences for disturbing the peace in your workshop.
Not to put any pressure on you or anything, but whatever you create in that room better be pretty high quality!
John Passaro said:
Not to put any pressure on you or anything, but whatever you create in that room better be pretty high quality!
Yea, thanks for that no pressure thing
(http://www.largescalecentral.com/externals/tinymce/plugins/emoticons/img/smiley-foot-in-mouth.gif)A little update on the project.
Another look at the outside where I have a little more railroad “art” displayed. The cross buck is heavy steel so I decided that this was as high as I needed it displayed, besides I have a sign I want to hang above and between the windows. The “clanger” is pretty cool and still works when hooked up to a 6 volt battery. In the back left is a little sneak preview of what’s coming soon.

I wanted to share a picture of the water barrel that my Sister and B-I-L gave me as a shop warming gift. I don’t think it will show in this picture but it is stenciled “Southern Pacific RR” and burn branded SP Co. An original artifact with faucet and brass padlock, way cool.
The actual railroad construction will be starting soon so please stay tuned.
Rick
Staying tuned…(http://www.largescalecentral.com/externals/tinymce/plugins/emoticons/img/smiley-wink.gif)
The start of bench work along the boundary fence, the bench work is built against the fence but not attached to it. This will make fence board replacement a simple matter if ever required, hopefully not in my remaining time. All support legs are 2 X 4 or 4 X4 set at least a foot deep in concrete. All horizontal members rest on a vertical support not attached to the side of one. Based on my past experience I have found it best if the horizontals have direct support rather than hung by a couple of screws. Also support legs no further than 3 foot apart seem to keep the horizontal members stable and prevent sagging. A lot of extra work but I hate having to do things twice.

The bench tops are about complete along this fence line except in the center area where the wye and the bridge will be built. The ½ inch hardware cloth and the Weed block/ground cover have been stapled in place and all the pressure treated framing painted an earth brown color.

The exit from the train shop is in place and waiting for the third leg of the wye to be built here. The false front building is just a way to water seal and insulate the wall opening not ment to be a scale structure.

Thanks for taking a look
Rick
looks good Rick. You’re putting that younger guy to shame…(http://www.largescalecentral.com/externals/tinymce/plugins/emoticons/img/smiley-wink.gif)
What’s the spacing on those horizontal x-members?
Looks great. I have a couple of questions, how high is your benchwork? When the ground slopes, are you keeping it level, or maintaining distance from the ground?
Thanks,
Chris
Looking good there Rick, keep going. At least someone can work on their railroad. Mine is currently under 8" of white stuff that fell the last couple of days. So we’re down for the season.
Love it Rick!
Damn shame that wheelbarrow tire from the 70’s blew out on ya as you might need it.
Ken Brunt said:
looks good Rick. You’re putting that younger guy to shame…(http://www.largescalecentral.com/externals/tinymce/plugins/emoticons/img/smiley-wink.gif)
What’s the spacing on those horizontal x-members?
Hey Ken,
Now days they are just about all younger guys(http://www.largescalecentral.com/externals/tinymce/plugins/emoticons/img/smiley-frown.gif)
The tables are built in 8 foot modules with PT 2X4 on edge and the cross members are 12 inches on center. The cross members where legs attach are vertical and all others are flat, flush with the top, this cuts the open span down to 9-10 inches and really helps with the sag issues of the hardware cloth. On an 8 foot module there is a leg at each end and 2 in between, I am hoping this will eliminate the sagging issues of the 2 by runners that I had on the old layout using 4 foot leg centers.
Chris,
That question brings up a topic I am going to cover in more depth later but to give you an answer; I like to keep the bench work between 36 – 46 inches above the walking grade and as level as possible. Doesn’t always work out that well, especially in the case of the current build, as I said more on this soon.
Chuck,
Been pretty wet here lately not getting much done outside and they are talking about snow later this week, I could really do well without that(http://www.largescalecentral.com/externals/tinymce/plugins/emoticons/img/smiley-tongue-out.gif)
Rooster,
Surprised you remember that old picture of the pregnant wheel barrow tire(http://www.largescalecentral.com/externals/tinymce/plugins/emoticons/img/smiley-foot-in-mouth.gif) But there is a new one on there now and it is getting plenty of use(http://www.largescalecentral.com/externals/tinymce/plugins/emoticons/img/smiley-frown.gif)
Thanks guys, more later
Rick
I like the idea of a “wye”. That’s something I’ve always wanted on my layout but didn’t have the room for it with the old layout. Worked out good on the new one.
Removed double post
Rick